Bluepill: a GCC/CMake build environment ..
Table of Contents
Intro
Note: Since I've written this there have been several efforts to build a complete CMake system. The most complete and impressive one I've seen is https://github.com/ObKo/stm32-cmake
While this page will still have good info and is educational (esp concerning OpenOCD/GDB) - if you want to do a serious project please take a look at ObKo's template/framework. I've only used it a bit - but it seems very polished and is similar in principle to what I've done. It supports pretty much all STM32 chips so it's not quite as simple as what I've done here
In this guide we will setup a simple minimal blinky for the Bluepill - a very cheap board available from China with the STM32F103C8T6 chip on it. They cost a smidge over one dollar each.
I will be building a blinky using STM32's Low Level API (explained below). I noticed everyone seems to still be using Make so I've tried to change things up and write up a whole toolchain for this board in CMake so hopefully this guide will provide something new and interesting for some people. At the end I will show how CMake allows us to plug in our project into basically any modern IDE - and we'll get the whole thing running just using GCC and OpenOCD. I have virtually no experience with embedded development, so if there are mistakes or you just want to tell me I'm an idiot, please leave an issue on the github repo. Note that a big part of the guts of this project are in the submodule which has its own repo

This file and webpage is an org-document and the code within is automatically tangled into the files in the project. I try to note any files I've manually copied from elsewhere
A Quick start
If you just want to try it out you just need to install cmake gcc-arm-none-eabi and openocd. You will also need a bluepill and a ST-Link V2 device. Attach those to your computer and run:
cd your/source/directory
git clone --recurse-submodules https://github.com/geokon-gh/bluepill.git
cd your/build/directory
cmake -DCMAKE_TOOLCHAIN_FILE=your/source/directory/bluepill/toolchain.cmake your/source/directory/bluepill/
make
opeocd
Prior Art
Some (but not all) of the projects from which I took ideas, inspiration and suggestions:
dwelch67has some great extremely minimal setups for the blue pilll on his github. He describes them extensively in a few places on Stack Overflow. Basically here he rolls his own .. everything. It's very greybeard. All the code is in your face - no libraries. Straight writting to registers. Definitely take a look!PurpleAlienhas another setup - which is very close to what I'm doing. He described it on his website and the code is on the his github. It's a slightly different chip - but the steps should work almost identically for thebluepill.satoshinmhas a wonderful guide where he guides you through all the challenges he had setting up his bluepill. It's long but very informative and I recommend reading it. He also has an accompanying repository where we has code for the blinky working using bare metal, the STM HAL and another 3rd party library. His code (the bare metal part especially) was absolutely invaluable for getting my setup up and running. Check out his github project.
Anatomy of a build
Unfortunately getting started and just getting a light blinking involved quite a lot of steps since we have no operating system to handle all the background stuff. I am writing all the piece out here in detail - but please do consider reusing some files from the templates provided by STM. Specifically look in the Cube package in STM32Cube_FW_F1_V1.6.0/Projects/STM32F103RB-Nucleo/Examples_LL/GPIO/GPIO_InfiniteLedToggling. Under SW4STM32 you will find a startup script and a linker script. And in Src / Inc you will find additional code files. I will try to mention them in passing.
CMake
CMake is meta build automation tool. You define your project targets, how you want things linked and built and then it will generate build tools for you. Typically we just generate Make files but it can also coordinate system installation, generate installer wizards for Windows, generate Visual Studio project files and more. CMake has in effect standardized builds into a common set of easy to use terms - so while it's not as flexible as Make and you have to follow a certain layout/pattern, in the end everything ends up cleaner and more reusable and it's hard to shoot yourself in the foot. For us it will be our central tool for coordinating the build and we will define our whole project through a CMakeLists.txt file in our project root. We will see later that actually CMake will give us crucial project meta-information that Clang-tools and IDEs like CLion and KDevelop can hook into it to provide code highlighting/completion and other goodies. All of this is a serious quality-of-life improvement over vanilla Make. Because CMake has become the defacto standard in the C++ world the ecosystem of tools around it just keeps growing year to year.
Starting our CMakeLists.txt we write out the usual CMake version and project name
cmake_minimum_required(VERSION 3.0)
project(blinky)
Our end goal is to create an ELF file that we will flash onto the chip. I suggest adding the .elf extension explicitly to your target name. To keep the template generic enough I just name the elf the same as the project name. So if you fork this project and do your own thing - you can just change the project name and you'll be good to go
set(ELF ${PROJECT_NAME}.elf)
The Linker Script
When an application normally runs on a desktop machine it's generally running using virtual memory in a virtual application-specific address space. From the applications point of view it can manipulate its own memory however it wants - and it's the operating system that then translates that into safe operations on the actual memory (for instance to insure that the applications don't touch any memory region they shouldn't)
On a microcontroller by default there is no operating system to manage the memory and the memory is shared with other functionality - some addresses are reserved for peripherals, other addresses are for interrupts and reset bits, the stack and heap are allocated in some device-specific place and there is also a split between ROM and RAM.
Because of these new limitations we can't just start executing code at address zero or drop in a main() function somewhere randomly and start there, we need to tell the linker what the code layout is though a custom linker script. First we tell it which parts correspond to ROM and RAM and what will be their respective sizes. ROM (Read Only Memory) is where the code and constants live, and RAM (Random Access Memory) is where the stack and heap live - the stuff that's dynamic.
MEMORY
{
    rom (rx) : ORIGIN = 0x08000000, LENGTH = 64K
    ram (rwx) : ORIGIN = 0x20000000, LENGTH = 20K
}
PROVIDE(_stack = ORIGIN(ram) + LENGTH(ram));
Even give that, code on a microcontroller doesn't by default start at the first address of ROM and go from there. On a desktop program you generally have an entry point (a main()) and an exit point (ex: exit 0). But a better way to think about the way a microcontroller works is it's as a machine that recieves interrupt signals from external inputs and the chip responds by running code and then returns to whatever it was doing before. These interrupting inputs can be a clock running out, a peripheral wanting attention, an attached debugger wanting to pause everything, etc. There is no real starting point nor an "exit"
So instead of a main() or something, the first thing in ROM is a vector table - a table of pointers to the different interrupt handlers. These handlers are the code that is run when each interrupt happens. The first interrupt handler in this table will be special and it's the one that is triggered when the system is powered on, the user presses the reset button, or the code runs out of things to do. It's appropriately called the reset handeler
EXTERN(vector_table);
ENTRY(reset_handler);
These two are just symbols for the linker - and it will look for them later in the actual code it's linking. So we need to not forget to define them :)
Lastly we need to tell the linker that we want those vectors first in the ROM and aligned at the byte level (b/c the micro reads things in byte sized chucks)
SECTIONS
{
    .text : {
        *(.vectors)
        *(.text*)
        . = ALIGN(4);
    } >rom
}
So the chip doesn't need to hunt for the vector table. It's always in the same spot at the start of the ROM - and the reset handler is as well.
The Startup File (WIP)
As I mentioned, the reset handler and vector table are just symbols to the linker at this point - so the next step is to write the code for them. The vector table will be set to some default values (and can be changed later) and we'll write the reset handler in a generic way that we can reuse between projects. It will do some initializations and then at the end call to main(). Then when we start a new project we can copy over this file and simply start writing a main() skipping all that initialization. In so doing we've split off these the generic reusable stuff into a separate startup file.
Note: There is nothing special about this file for the compiler or linker - it's just another code file - and you are free to copy it over to your other code files if you want
The code from top to bottom:
- We define a reset handler
- We declare a
main()(to be defined in ourmain.clater) - We initialize some stuff
- We call main()
- We declare a
- We define two dummy interrupt handlers.
- One that spins for ever
- One that does nothing and returns
- We define our vector table in detail
- The first element is the SP (Stack Pointer)
- The second element is always the reset handler
- After that are the remaining handlers which are being set to basically do nothing
  int main(void);
  void __attribute__ ((weak, naked)) reset_handler(void) {
      (*(volatile unsigned int *)(0x40021018)) |= (1 << 4);

      (*(volatile unsigned int *)(0x40011004)) |= (0x00 << (((13 - 8) * 4) + 2));
      (*(volatile unsigned int *)(0x40011004)) |= (0x02 << ((13 - 8) * 4));
      main();
  }

void blocking_handler(void) { while (1); }
void null_handler(void) {}
extern unsigned _stack;

__attribute__ ((section(".vectors")))
struct {
    unsigned int *initial_sp_value;
    void (*reset)(void);
    void (*nmi)(void);
    void (*hard_fault)(void);
    void (*memory_manage_fault)(void);
    void (*bus_fault)(void);
    void (*usage_fault)(void);
    void (*reserved_x001c[4])(void);
    void (*sv_call)(void);
    void (*debug_monitor)(void);
    void (*reserved_x0034)(void);
    void (*pend_sv)(void);
    void (*systick)(void);
    void (*irq[68])(void);
} vector_table = {
    .initial_sp_value = &_stack,
    .reset = reset_handler,
    .nmi = null_handler,
    .hard_fault = blocking_handler,

    .sv_call = null_handler,
    .pend_sv = null_handler,
    .systick = null_handler,
    .irq = {
        null_handler,
        null_handler,
        null_handler,
        null_handler,
        null_handler,
        null_handler,
        null_handler,
        null_handler,
        null_handler,
        null_handler,
        null_handler,
        null_handler,
        null_handler,
        null_handler,
        null_handler,
        null_handler,
        null_handler,
        null_handler,
        null_handler,
        null_handler,
        null_handler,
        null_handler,
        null_handler,
        null_handler,
        null_handler,
        null_handler,
        null_handler,
        null_handler,
        null_handler,
        null_handler,
        null_handler,
        null_handler,
        null_handler,
        null_handler,
        null_handler,
        null_handler,
        null_handler,
        null_handler,
        null_handler,
        null_handler,
        null_handler,
        null_handler,
        null_handler,
        null_handler,
        null_handler,
        null_handler,
        null_handler,
        null_handler,
        null_handler,
        null_handler,
        null_handler,
        null_handler,
        null_handler,
        null_handler,
        null_handler,
        null_handler,
        null_handler,
        null_handler,
        null_handler,
        null_handler,
        null_handler,
        null_handler,
        null_handler,
        null_handler,
        null_handler,
        null_handler,
        null_handler,
        null_handler,
    }
};
Now if you open up some startup files in the templates provided by STM you will see that they're all written in assembly and they do a little more than we are doing here. If you squint and look at the assembly you will see that the code is doing basically the same thing + some extra magic - but on a high level it's also defining a reset handler which then calls a main. The remaining interrupt handlers are actually defined in C in stm32f1xx_it.h/c which is next to the source files and headers.
Once we have the file we can add it to CMake
enable_language(ASM)
set(STARTUP_FILE "startup_stm32f103xb.c")
The STM Libraries
Next we need actual libraries to write code with - otherwise we are kinda stuck poking at memory addresses with the datasheet. These are all provided in one bundle called Cube and it's on the STM website. Here is a quick digest of what you get:
- The BSP has board specific peripheral libraries.. since we aren't using a board from STM - this really doesn't concern us.
- The HAL that comes from STM is the standard Hardware Abstraction Layer. It will be making some simplifying assumptions and do some stuff more automatically for you. I'm going to skip setting this up. Blinking a light should be pretty simple - so I'm shooting to get it working with simpler APIs
- Hidden inside of the HAL folder you will see files that are names
stm32f1xx_ll_*.c/h. These actually form a seperate sub-library of sorts called the LL API (for Low Level) - The CMSIS ( Cortex Microcontroller Software Interface Standard ) : This library comes from ARM (not STM). It's split into several semi-independent components and provides a common base for all ARM devices (independent of vendor). The HAL and LL API are built on top of the CMSIS
Both the HAL and CMSIS need some chip-specific configuration - b/c while the API is standard, under the hood things will change from chip to chip (like memory addresses of things or clock information). I've bundled the LL API and the CMSIS together in a separate project stm32f1-ll (github). It's also building with CMake so we can use it directly in our project (and you can skip registration and downloading the Cube thing). I recommend checking out that project's webpage for more details on how it works - but there is very little magic going on.
The library bundle has been added as a submodule to this project, but if you forgot to clone recursively you can clone it right now into the project root with git clone https://github.com/geokon-gh/stm32f1-ll/. Once we have it there we can just add it in
add_subdirectory(stm32f1-ll)
Note:in
STM32Cube_FW_F1_V1.6.0/Middlewaresthere are additional libraries that sorta live on top of all of this and do more complicated stuff like TCP/IP USB..stuff and Filesystem things. Basically things that are kinda complicated and that you probably want to avoid writing yourself. I'm completely skipping this :)
Our blinky code
Now that we have a linker that can put the code in the right places, and the startup code to initialize things correctly for us we can finally write our blinky code in /src/main.c
The libraries/modules in the LL-API are pretty fragmented/decoupled. So while we want to use the GPIO, we also need a few other libraries to get started. The GPIO peripheral for starters need to be powered on by the microcontroller (all the peripherals are powered off by default). The system responsible for that is called Reset and Clock Control, RCC for short. There is another module called BUS which seems to just have helper functions to turn on/off RCC sections.
So first we include all three of these modules
#include "stm32f1xx_ll_bus.h"
#include "stm32f1xx_ll_rcc.h"
#include "stm32f1xx_ll_gpio.h"
Then we can start writing our main()
int main(void)
{
We use a BUS module macro to enable the GPIO peripheral. The LED we want to blink on the board is labeled PC13. PC stands for Port C and it's number 13. So we enable GPIO port C. The peripherals controlled by the RCC system are split into two sections APB1 and APB2. GPIO is in the APB2 section.
LL_APB2_GRP1_EnableClock(LL_APB2_GRP1_PERIPH_GPIOC);
We then set this GPIO pin to be an ouput pin and we set it to be a high speed pin
LL_GPIO_SetPinMode(GPIOC, LL_GPIO_PIN_13, LL_GPIO_MODE_OUTPUT);
LL_GPIO_SetPinSpeed(GPIOC, LL_GPIO_PIN_13, LL_GPIO_SPEED_FREQ_HIGH);
Now that we have the GPIO pin setup we just have an infinite loop that toggles the pin and spends some time sitting in a loop doing nothing
  while (1)
  {
    LL_GPIO_TogglePin(GPIOC, LL_GPIO_PIN_13);
    int i = 200000;/* About 1/4 second delay */
    while (i-- > 0) {
        asm("nop");/* This stops it optimising code out */
    }
  }
}
And that's it!
If you look at the GPIO example that comes with the Cube package you will see it does the waiting/spinning in a smarter way using the clock system. But this requires setting up the clock properly and is a bit more complicated. You will also need the system_stm32f1xx.h/c files to configure the clock. For simplicity I've omitted this - but you probably want to add that back in if you're doing more complicated stuff.
We can now return to CMake and declare our target elf file and link up our main.c with the startup file.
add_executable(${ELF} ${STARTUP_FILE}
  src/main.c)
target_include_directories(${ELF} PUBLIC inc)
and then we link it to the LL-API library we are using
target_link_libraries(${ELF} ll )
And I'm also adding in a include directory for future use (it's empty for now)
target_include_directories(${ELF} PUBLIC inc)
The toolchain
Now that we have all the pieces we just need to tell CMake how we want everything compiled. I'm building using gcc-arm-none-eabi and its associated tools. I did this on a Debian system where this version of gcc can be installed from the repository (name gcc-arm-none-eabi)
Canonically the compiler is specified in a separate file so that you can subsitute other possible toolchains (like for instance LLVM or custom versions of GCC). I'll just setup GCC as an example and write it out to a toolchain.cmake file in the source directory
set(CMAKE_SYSTEM_NAME Generic) # 'Generic' is used for embedded systems

set(CMAKE_C_COMPILER arm-none-eabi-gcc)
set(CMAKE_CXX_COMPILER arm-none-eabi-g++)
set(CMAKE_ASM_COMPILER arm-none-eabi-gcc)

# tells CMake not to try to link executables during its interal checks
# things are not going to link properly without a linker script
set(CMAKE_TRY_COMPILE_TARGET_TYPE STATIC_LIBRARY)

set(CMAKE_OBJCOPY arm-none-eabi-objcopy)
set(CMAKE_OBJDUMP arm-none-eabi-objdump)
set(CMAKE_SIZE arm-none-eabi-size)
set(CMAKE_DEBUGGER arm-none-eabi-gdb)
set(CMAKE_DEBUGGER arm-none-eabi-gdb)
set(CMAKE_CPPFILT arm-none-eabi-c++filt)
If you skip writing a toolchain file then CMake will default to the system compiler and things will start to slowly go wrong for you (kinda unfortunately, it generally doesn't blow up into your face here)
Next will also need to tell the linker which linker script to use (which is a bit ugly in CMake)
set_target_properties(
  ${ELF}
  PROPERTIES
  LINK_FLAGS
  "-T${PROJECT_SOURCE_DIR}/STM32F103RBTx_FLASH.ld \
   -mthumb -mcpu=cortex-m3 \
   -Wl,--gc-sections \
   -Wl,-Map=${PROJECT_NAME}.map")
I'm appending this to the CMakeLists.txt, but it's something that maybe could be in the toolchain file. However b/c it does need the target name (${ELF}) it's more convenient to just append it to the CMakeLists.txt (something to maybe revisit in the future)
You'll also notice I added some more linker options - the first two tell the linker it the chip type and the instruction set and the other two:
Note: At first I hadn't given the computer arch/intruction-set flags b/c they're being given to the compiler below and I ended up with a very very subtly big where
__libc_init_array addresswas trying to jump to some addresses right outside of the ROM. It was very bizarre and took me a whole day to track down.
--gc-sectionsthis tells the linker to remove unused code/data from the final executable. There is a pesky_exit()function referrence that will often get slipped into your executable by the compiler. B/c we are running on a microcontroller the code never really exits (it can't quit and hand off executation to an OS after all!) so this exit needs to be removed by the linker. If you leave this off then the linker will get confused and start complaining you never defined an exit function.-Mapprints a link map:- Where object files and symbols are mapped into memory.
- How common symbols are allocated.
- All archive members included in the link, with a mention of the symbol which caused the archive member to be brought in.
The link map is a high-level overview of how your code is placed in memory
More linker options are explained in details here: https://ftp.gnu.org/old-gnu/Manuals/ld-2.9.1/html_node/ld_3.html
We then also need to let the compiler know our target architecture and some compiler options (taken from PurpleAlien)
target_compile_options(${ELF} PUBLIC
  -Wall
  -g
  -std=gnu99
  -Os
  -mthumb
  -mcpu=cortex-m3
  -mfloat-abi=soft
  -mlittle-endian
  -ffunction-sections
  -fdata-sections
  -Werror
  -Wstrict-prototypes
  -Warray-bounds
  -fno-strict-aliasing
  -Wno-unused-const-variable
  -specs=nano.specs
  -specs=nosys.specs)
TODO Explain all of these… and again.. would be nice to have in the toolchain file
Getting the code on the chip
Building
At this point we have all the files we need to build the code, so just go to a new empty directory and run
cmake -DCMAKE_TOOLCHAIN_FILE=path/to/source/toolchain.cmake /path/to/source/
make
Now in the build directory you'll have some build garbage, the link map blinky.map and blinky.elf - which is the code/executable that we want to get onto the bluepill.
OpenOCD
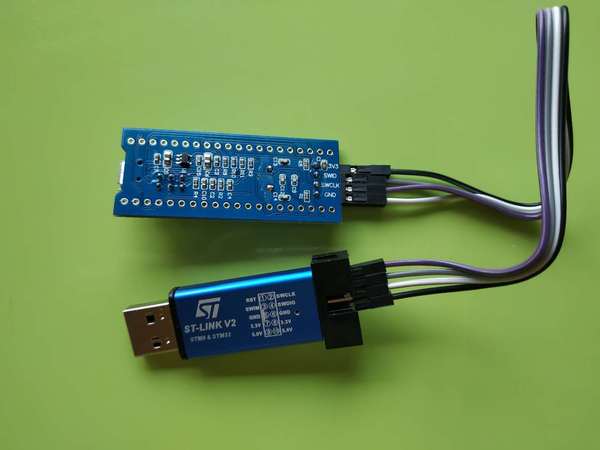
The standard open source software for flashing the bluepill is OpenOCD. On educational/more-expensive boards there will be a secondary chip that helps you flash the microcontroller. But on cheaper and more practical chips this part is omitted (b/c in a sense it's a waste to have the same chip on every single board). So to flash the bluepill you will need something to do the flashing with. I'm using a knock off ST-LINK v2 I purchased on Taobao. (note the wiring is in a different order on the board and programmer)
OpenOCD will provide us with an abstraction layer. It will communicate over JTAG or SWD to the chip and we will communicate with OpenOCD and tell it what we need.
OpenOCD's software setup is rather baroque - but the documentation is very thorough. You start from the beginning and just read very carefully sequentially and it will all make sense. Fortunately for us - the hardware we're using is very standard so we can use some already provided templates. When I install OpenOCD on my Debian system through apt-get install openocd the templates are in /usr/share/openocd/scripts/board/. After browsing some similar boards (like the stm32f4disovery) you kinda get the picture of how the configuration file should look (THESE VALUES CHANGE BETWEEN POINT RELEASE OF OPENOCD. DOUBLE CHECK THEM IF YOU HAVE ANY ISSUES)
The configuration is a bit finicky. For OpenOCD to automatically pick it up it needs to be called openocd.cfg and it needs to be in the directory where you run openocd.
source [find interface/stlink-v2.cfg]
transport select hla_swd
source [find target/stm32f1x_stlink.cfg]
program blinky.elf verify reset exit
The finaly file isn't too complicated. It sets the interface type (ie the ST-LINK flashing dongle thing), then it sets the flashing communication protocol for talking to the chip, then the actual chip type and lastly we tell it to program the chip with the .elf we just made. After flashing it will verify the code, reset the controller and then exit OpenOCD
For convenience we should also tell CMake to copy this file over to the build directory
file(COPY
  openocd.cfg
  DESTINATION
  ${CMAKE_BINARY_DIR})
So now in our build directory we simply run openocd and your program should magically upload to the chip and start running. The light should be flashing at this point :)
If it's not, Some things to double check:
- The version of OpenOCD you are running… I had weird issues with manually installed OpenOCDs, but the repo one worked great
- Check the templates - if you have problems, try some of the other options available
- try running OpenOCD as root! Maybe your user doesn't have the right USB permissions or something to that effect
- I had weird connection issues that turned out to be due to faulty wires! Thanks to NeoMarxismIsEvil for catching that :)
- In the next section about GDB I mention an
unlockcommand.. I'm not 100% sure it's necessary - but try it if you're having issues
Intergrated Development
One of the big bonuses of using CMake is that it will hook into existing tools very easily.
GDB
The first basic step is hookin' up a debugger.
For some reason Debian (Testing) is missing a arm-none-eabi-gdb, so I had to just download the whole GCC toolchain from ARM's website (this only works assuming you're running on a x64 machine). Just whatever you end up using, make sure you don't just run the system GDB! It won't throw you any errors and it will kinda work.. till it doesn't.
Once we have the right version of GDB the next part becomes super easy b/c by default OpenOCD will provide us with a GDB server to which we can connect. We just need to disable the part where we flash the program and exit and replace it with a command to reset the chip and wait for GDB
source [find interface/stlink-v2.cfg]
transport select hla_swd
source [find target/stm32f1x_stlink.cfg]
reset_config srst_nogate
I honestly didn't entirely understand all the reset configuration options so if you're having issues I'd suggest looking at the documentation and trying several different settings. I've found the current one works for me. Again, we just run openocd but this time the program kinda hangs and sits and waits for a connection:
$ openocd Open On-Chip Debugger 0.10.0 Licensed under GNU GPL v2 For bug reports, read http://openocd.org/doc/doxygen/bugs.html WARNING: target/stm32f1xstlink.cfg is deprecated, please switch to target/stm32f1x.cfg Info : The selected transport took over low-level target control. The results might differ compared to plain JTAG/SWD adapter speed: 1000 kHz adapternsrstdelay: 100 none separate none separate Info : Unable to match requested speed 1000 kHz, using 950 kHz Info : Unable to match requested speed 1000 kHz, using 950 kHz Info : clock speed 950 kHz Info : STLINK v2 JTAG v17 API v2 SWIM v4 VID 0x0483 PID 0x3748 Info : using stlink api v2 Info : Target voltage: 2.913562 Info : stm32f1x.cpu: hardware has 6 breakpoints, 4 watchpoints
We open another terminal and run our arm-none-eabi-gdb to bring up the GDB "shell" The next few steps will connect to the OpenOCD server, stop the program running on it, unlock the chip, and load our new program
> target remote localhost:3333
> monitor reset halt
> monitor stm32f1x unlock 0
> load blinky.elf
Now you can set breakpoint, run code, inspect the stack and variables, etc. etc. Look at the GDB manual for all the juicy details - and don't forget about the very handy TUI Mode. Start it with C-x C-a, then hit C-x 2 to bring up the assembly. And type s or n to step one line of code at a time and si to step one assembly instruction at a time!
KDevelop
To demonstrate how flexible things get thanks to CMake, next I'll show you how to setup KDevelop to run everything for us. In principle this should work equally well with QtCreator or CLion or CQuery/Emacs. You can even hook up linters and other fancy Clang based tools now pretty easily. So this isn't an endorsement of KDevelop over the alternatives b/c after all it's sorta like Visual Studio - a big drop-box driven mess - but I'm just familiar with it and it's quick and easy to get up and running with a CMake project. We'll be able to jump around our code and refactor things in no time. The easiest way to get started is to just get the KDevelop AppImage from their website. Download it, make it executable with chmod +x $KDevelopAppImageFile and run!
Next you click Project > Open - Import Project and the navigate to a copy of this repository where the CMakeLists.txt resides. It should automatically give you a window with the project name and with the CMake Project Manager. Just hit Finish on the bottom row and you will get another window to set up your CMake configuration. Here you need:
- Select a build directory
- I typically don't go with the default (b/c my code resides on a USB drive) and I build somewhere else on my main disk. Always using a
project_name/builddirectory encourages people to write sloppy build files that reach into the repository (b/c you can always go../from the/build/folder to get to the repository files). But you shouldnt' write code/configurations that assume their built location ;)
- I typically don't go with the default (b/c my code resides on a USB drive) and I build somewhere else on my main disk. Always using a
- The installation prefix can be left blank
- CMake is a bit weird in that it's not just a build tool, but it also has these unnecessary installation features that keep cropping up
- Build Type
- This part I don't 100% understand at the moment.. but I think you can go with Release here. GDB seems to somehow magically find the matching source code on its own even when you build with no symbols. But if you have issues with debugging don't hesitate to switch to Debug
- Provide extra arguments to CMake
- Here we need to tell CMake about our toolchain. Unfortunately a lot of people don't use toolchain files - as you always always should - and they just go with the random system defaults. KDevelop seems to encourage this further by not providing a field for the toolchain file.. so you need to add a
-DCMAKE_TOOLCHAIN_FILE=/path/to/your/project/directory/bluepill/toolchain.cmakein the extra arguments area here (yeah.. this is a bit clunky..)
- Here we need to tell CMake about our toolchain. Unfortunately a lot of people don't use toolchain files - as you always always should - and they just go with the random system defaults. KDevelop seems to encourage this further by not providing a field for the toolchain file.. so you need to add a
Then just hit Run and the wheels should start turning. It will load in your whole project and then index your code + LL/CMSIS libraries for a few minutes. At this point you can already hit Build in the top left and make that elf file like we did from the command line. Infact, underthe hood KDevelop is doing exactly what we did before manually. If you cd to your build directory you can still run make by hand if you want
But now we are also getting the benefits of CMake. You can now click on variables, jump around the code and get all the fancy syntax highlighting you expect in a desktop program
Extras
KDevelop unfortuantely has some very bizarre default working directories in their configurations…
- Execute
To make the Execute button flash the program to the chip go to Run > Configure Launches… and then hit + Add in the top left and select your target's name from the drop down menu (mine is called
blinky.elf). In the new screen on the right side, you want to change the Executable from Project Target to Exectuable and then put in the full path to openocd (mine is/usr/bin/openocd). We also need to set the Working Directory to be the build directory so it can find theopenocd.cfgfile we made. So now when we hit Execute on the top bar it will just runopenocdin the build directory. The way we've set things up, this should flash the chip! - Debug (WIP)
In that same window you will notice there is a Debug submenu on the left under our target executable. It's probably possible to get the
OpenOCD/GDBsetup running here as well - but unfortunately here things just got too ugly for me and I couldn't find a sane way to set this up (and I kept having issues where KDevelop wasn't cleaning up the OpenOCD processes correctly). If you find a clean way to get this working then please make an issue/PR and tell me about it :)This webpage is generated from an org-document (at
./index.org) that also generates all the files described.Once opened in Emacs:
C-c C-e h hgenerates the webpageC-c C-v C-texports the code blocks into the appropriate files